
Bird-themed lessons and activities
All of Southern Wisconsin Bird Alliance’s bird-related lessons and activities for kids and classrooms.
-
30 -60+ min Indoor/Outdoor All ages
Space required: A place to lay out bird specimens, outdoors will work if you bring a blanket/similar.
Materials: Madison Audubon bird nest collection, pictures of bird nests.
Remember: Tampering with or disturbing the nests of birds native to North America is illegal. View them from a distance. Collection and keeping bird nests requires special permits, which Madison Audubon has. Explain this to kids!
Learn as much as possible about the specimens you are using before teaching with them. Below is a basic lesson plan.
What do birds use their nests for? Nests hold bird eggs and chicks (baby birds). They help keep eggs & chicks warm and safe while they grow.
Do birds reuse nests? Most birds do not reuse their nests after chicks hatch. Some birds like hawks, eagles, and owls may use the same nest for many years.
What do birds use to build nests? Each type of bird has a specific material they like to use. Hawks and eagles use large sticks, many songbirds use grasses or small twigs, barn swallows use mud and saliva. Some bids, Killdeer, lay their eggs right on the ground and don’t build much of a nest at all.
Where do birds build nests? Everywhere! Some birds build nests in tree branches, others nest in holes in trees (cavities). Some build nests on the ground, or in shrubs, others nest on man-made structures. Some even build floating platforms in water!
How do birds protect their nests? Large birds like hawks and eagles may defend their nest with their beaks and talons- they fight off predators. Most birds try to camouflage their nest- they hide it in the habitat they’re living in.
How can we help birds in their nests? Keep a good distance away from them, so they’re not nervous. We seem like predators to them! Also, keeping away from the nest keeps our scent away too. Animals that might eat the eggs or chicks can smell our scent at the nest, and they might go to investigate- and find a snack! Keeping our pets inside or away from nests also keeps birds safe.
Options:
Lay everything out at once or bring out things one at a time or in groups.
Offer facts about things or let kids lead the discussion by asking questions.
Let kids carefully hold items, let kids touch with one finger, or let kids observe with their eyes.
Let kids compare, contrast, and make observations about the items.
Original Madison Audubon lesson
-
15-60+ min Indoor/Outdoor Calm K-5
Materials: Pictures of local owl species, device to play owl calls/sounds, specimens, owl games (#42,43), owl pellet dissections
Prepare for this lesson by brushing up on your owl facts! This is only an outline of topics to cover, not the facts themselves. Pair with games about owls or owl specimens & pellets for extra fun!
Identification: owls have round bodies and heads, flat faces, and large eyes that they can’t move
Habitats: everywhere! Deserts, forests, rain forests, grasslands, arctic tundra, farmland, cities.
Nest locations: cavity or stick nests, nesting on the ground, Burrowing Owl uses old mammal burrows.
Review which owls are native to WI, and which are the ones most commonly seen (Great Horned, Barred, Eastern Screech).
Owl Pellets: what they are, why owls do that, what we can learn from them
Owl adaptations:
Feathers = silent flight, camouflage
Eyes = see in low light
Neck = turn head ¾ of the way around
Feet = grip prey
Beaks = kill prey
Owl sounds: play sounds for kids, teach them to mimic owl sounds with their voices.
Great Horned Owl: “Who’s awake? Mee toooo”
Barred Owl: “Who cooks for you? Who cooks for youuuu ALLLLLLLLlllllllll?” Monkey calling.
Eastern Screech: sounds like a frog horse!
Original Madison Audubon lesson
-
30 min Indoor/Outdoor G2-5
Space required: A place to lay out activity. Tables work best. There is potential for sticky marshmallows and water spills.
Materials: Bird Beak Buffet lesson plan (https://madisonaudubon.org/stand-alone-activities) and/or lesson kit (https://madisonaudubon.org/lesson-kits). These materials are common household items, and easy to collect if borrowing our kit isn’t an option!
Summary: Kids pretend household tools like slotted spoons, skewers, eye droppers, and tweezers are bird beaks. They need to use the “beaks” to pick up various types of bird food, and determine which beak is best for picking up each type of food. Then they can explore whether the beaks are only able to “eat” one type of food (specialist) or if they can eat many (generalist).
There are many forms of this lesson online. This one was adapted by Madison Audubon from the Flying Wild curriculum.
-
30-60 min Indoor/Outdoor All ages
Space required: A place to lay out bird specimens outdoors will work if you bring a blanket/similar.
Materials: Bird feet (preserved specimens and rubber replicas), study skins with feet attached, and mounted birds with interesting feet. Prepare by learning as much background information about the specimens as possible.
Ask kids if birds all have the same types of feet. When they say “no”, ask for examples of different bird feet, and what they’re used for. Example: duck feet are webbed and good at paddling in water. Hawk feet are strong and have claws, they are good at catching and holding prey animals.
Remind kids about evolution and niches (Birds of the World). Have kids sort the feet into groups. Help kids compare and contrast feet, and use descriptive words to talk about the feet.
Let kids explore the specimens in whatever way makes the most sense for your group and your lesson goals.
Options:
Lay everything out at once or bring out things one at a time or in groups.
Offer facts about things or let kids lead the discussion by asking questions.
Let kids carefully hold items, let kids touch with one finger, or let kids observe with their eyes.
Let kids compare, contrast, and make observations about the items.
Remember:
emphasize that keeping bird specimens requires special permits, and that kids should return all natural objects they find to the wild (after they’re done looking at them!)
Be clear about which specimens were once living things and which ones are replicas.
Be clear about where the specimens came from (ie: no animals were killed just to add to the collection).
Original Madison Audubon lesson
-
30 min Indoor/Outdoor all ages
Space required: a place for the group to sit and talk, possibly where kids can see what you’re holding
Materials: field guides and pictures of birds. Optional: print images of birds with striking field marks. Good suggestions include American Robin, Baltimore Oriole, Blue Jay, Black-capped Chickadee and Tufted Titmouse
Ask kids if they think they are good birdwatchers. Explain that birdwatchers just enjoy watching birds!
Ask kids if they think they know how to identify a lot of birds.
Ask kids if they’ve ever seen a: pigeon, robin, blue jay, cardinal, crow, seagull, goose, hummingbird, mallard duck. That’s 10 birds!
Ask kids how they know what those birds are (hint: how is a hummingbird different from a goose?)
As they describe the way the birds look, guide them so that they use descriptive words about color, size, shape, and proportion.
Tell them that FIELD MARKS are anything about a bird’s body that helps us identify if. These things are usually different from what other birds have- they are special and unique.
Use yourself as an example for field marks. Say “today, my field marks are (color) legs, (color) belly, (color) feet, etc)”.
Hold up a photo of a bird. Ask kids to describe the field marks. Help them use descriptive words.
If possible, have them describe an American Robin first, then a Baltimore Oriole. This shows them the need to be as specific as possible.
Introduce a field guide. Tell kids it’s a book that birders use to identify birds they’ve never seen before.
If possible, hand out field guides to the kids. Guides with a reduced bird list are best so they don’t get overwhelmed.
Hold up a photo of a bird, have kids try to identify it. Start easy, then move to harder birds.
Original Madison Audubon lesson
-
30 min Indoor/Outdoor G2-5
Space required: a flat surface where kids can work. Outdoor will work if it is not windy.
Materials: Printed copies of the Madison Audubon Silhouettes OR magazines with pictures of birds, construction paper, glue, scissors, markers.
This art project encourages the use of body shape, size, and proportions to identify birds rather than relying on color. It is an important lesson for new birders, and will get kids to view their world in a fresh way. This activity includes an introduction for the class, and can then become an art project (create your own bird silhouette!), or a game (see below). Either activity can include a writing component. This activity can be adapted to a variety of other classroom uses: breaking up into teams or finding partners for other activities, matching games.
Find the pdf of this lesson at: https://madisonaudubon.org/stand-alone-activities
Original Madison Audubon lesson
-
30 min Outdoor, Active 3-8
Natural space with trails or room to explore is required
Materials: Binoculars, kids bird ID books
Talk to the kids about the ways we tell birds apart, ask them to tell you all the parts of the bird and then talk about the ways that all of these can be different. Hand out binoculars and talk about how to use them safely (do not walk while looking through them, keep the strap secured around your neck, etc.). Make sure you show them how to focus their binoculars and hand a bird ID book to anyone who wants one. Explore the natural area, walk the trails and see what birds you find! What behaviors is each bird exhibiting, what features that you discussed at the start of the lesson are visible on these birds, what is unique about each bird, etc.?
Original Madison Audubon lesson
-
30 min Indoor/Outdoor G2-8
Space required: a flat surface where kids can set up their BINGO board. Outdoor will work if it is not windy.
Materials: Printed copies of the Madison Audubon Birdcall BINGO sheet and bird pictures (cut bird pictures out – students can cut their own to save time). Access to the internet and speakers to play bird songs.
Find the pdf of this lesson at: https://madisonaudubon.org/stand-alone-activities
You can find bird calls and songs at a variety of places online. The National Audubon Bird ID app is free and easy to use. www.allaboutbirds.org/guide will let you search for birds using the Cornell website. Explore a few to find your favorite!
A fun way to learn bird calls and songs!
Pass out bird picture pieces to each student/group of students.
Play each bird call out loud, making sure to say the name of each bird.
Pass out empty Bird BINGO board. Students choose 16 of their favorite birds to place face-up on the board.
Play a random bird call. Students use the mnemonic (words to help us remember a bird song) to identify who is singing it. Students flip over the bird picture when they identify the call.
Play until a student yells “BIRDO!”, indicating that they have four in a row. Check for accuracy. Keep playing until you have a winner.
Shuffle pictures, replace on empty board, and repeat!
Variation:
Easier: state the name of the bird when you play the bird call (or slightly after, to allow kids to guess)
Harder: Play using the bird picture sheet that does not include mnemonics!
Many lessons exist like this, this version adapted by Madison Audubon
-
30 min Indoor/Outdoor G2-5
Space required: A place for the group to gather and look at pictures.
Materials: pictures (printed or digital) of birds from different places that look similar.
*Choose locations that are significant for your kids
Example birds/locations:
Waders: Sandhill Crane (North America), Painted Stork (India & Thailand), Shoebill Stork (Central Africa)
Raptors: Bald Eagle (North America), White-bellied Sea Eagle (India & Thailand & Australia), African Fish Eagle (Central & South Africa)
Ducks: Mallard Duck (North America), Mandarin Duck (East Asia), Hottentot Teal Duck (Central Africa)
Perching Birds: Black-capped Chickadee (North America), Rattling Cisticola (Central & South Africa)
Evolution: All living things that exist today evolved from things that lived before them. Plants and animals that were extra good at surviving had more babies/offspring, and they passed down their traits to their kids. Over time, plants and animals changed in ways that allowed them to specialize. Parts of their bodies or behavior became special – different from other similar animals.
Examples: Wading birds have long legs to keep their bodies out of the water as they walk through it. They also have long necks, so they can reach far to grab food. Ducks have webbed feet so they can paddle in water, and bodies that are good at floating.
Plants and animals living in the same environment all fit into a niche. A niche is both the space they occupy and the role they play. It’s like everyone having a job in a neighborhood: a teacher spends a lot of time in a school, and they teach students. A wading bird spends a lot of time in a stream or pond, and they hunt fish.
Discuss the facts about evolution and niches with kids. Shuffle the bird images and spread them out. Have kids compare and contrast the birds. Have kids sort the birds by group (waders, raptors, ducks, perching birds) and then by location/country. Discuss.
Original Madison Audubon lesson
-
30-60 min Indoor/Outdoor All ages
Space required: A place to lay out bird specimens, outdoors will work if you bring a blanket/similar.
Materials: Bird specimens such as study skins, bird feet, feathers, beaks. Prepare by learning as much background information about the specimens as possible.
Let kids explore the specimens in whatever way makes the most sense for your group and your lesson goals.
Options:
Lay everything out at once or bring out things one at a time or in groups.
Offer facts about things or let kids lead the discussion by asking questions.
Let kids carefully hold items, let kids touch with one finger, or let kids observe with their eyes.
Let kids compare, contrast, and make observations about the items.
Remember:
emphasize that keeping bird specimens requires special permits, and that kids should return all natural objects they find to the wild (after they’re done looking at them!)
Be clear about which specimens were once living things and which ones are replicas.
Be clear about where the specimens came from (ie: no animals were killed just to add to the collection).
Original Madison Audubon lesson
-
30 -60+ min Indoor/Outdoor G2-12
Space required: A flat surface to write & draw on.
Materials: Build A Bird lesson plan (https://madisonaudubon.org/stand-alone-activities). Blank paper, coloring, drawing and writing supplies. Possibly printed “body parts” (also available at above website), scissors, glue, construction paper.
Summary: Kids learn about evolution, adaptations, and bird body parts. They create their own imaginary bird that must live in a specific environment. They must determine what type of food it eats, whether it is nocturnal or diurnal, and any other adaptations it has to survive.
Options included in the lesson plan for adjusting it to younger or older kids, and for making it more of an art project or a writing assignment.
Original Madison Audubon lesson
-
30 min Outdoor, Active K-5
Outdoor space with vegetation and trees required
Materials: Natural materials for nest building
Bring nests to show the kids and make observations about how they are constructed. Talk about how important nests are (precious cargo!) and how strong they need to be to withstand the elements. Then have the kids split into small teams to collect materials (option: collect materials beforehand) and construct their nests. Encourage them to have patience and a sense of humor so they don’t get frustrated, this activity is difficult! Test the nests out with pebbles or ping pong balls to simulate eggs. Talk about how much more difficult this task would be if you could only use your feet and your mouths like birds do!
Originally Make a Nest by Peace Corps, with adaptations from Madison Audubon
-
Kids pretend to be birds and race to find appropriate habitat. Educators can add a climate change option.
-
A versatile obstacle course that lets kids experience how challenging migration can be for birds.
-
Students learn the basics of carbon cycling, and play a game to demonstrate molecular interactions
-
30 min In/Outdoor, Calm 2-5
Space: your group needs to stand in a circle with room to move around the outside of the circle.
Materials: bandana or blindfold, piece of scrap paper.
Owls have excellent hearing. Some owls can even listen to what’s happening under the snow, and catch mice THROUGH the snow! Wow!
A lot of owls have ears that aren’t level: if they were wearing sunglasses, they would be crooked!
This means that sound reaches each ear at a slightly different time
This helps the owls figure out exactly where the sound is coming from.
Introducing the game:
We’re going to learn what it’s like to listen like owls!
Everyone will stand in a circle. You’ll be trees in the forest.
One person will be a mouse. You’ll walk or run along the outside of the circle. Remember, be sneaky! You’ll have a piece of paper to crinkle, and we’ll pretend that you’re rustling leaves as you move through the forest floor.
One person will be an owl. You’ll stand in the center of the circle and wear a blindfold. You’ll stand in one place, but you can spin in a circle if you need to. Point to where you think the mouse is- that’s how we’ll pretend you’re catching the mouse. If you point to EXACTLY where the mouse is, you catch it!
If the game is too easy, have the “trees” make nature sounds to hide the sound of the mouse.
If the game is too hard, have the mouse say “squeak” occasionally
There are many versions of this on the internet. Madison Audubon has been playing this adapted version for so long that we’re not quite sure where it has come from!
-
30 min Outdoor, Active K-5
Outdoor space to run!
Materials: Madison Audubon Owl Masks (or you can make your own using toilet paper tubes – like binoculars- and construction paper for the face)
This game will let us see what it’s like to be a hunting owl.
The facts kids need to learn:
Owls have REALLY big eyes. This lets a lot of light into their eyes, even when it’s nighttime.
Owl eyes are SO big that they can’t move their eyes in their head.
Everyone roll their eyes to the left. Now the right. Now pretend your teachers asked you to clean up an art project- give us your biggest eye rolls ever.
Owls can’t do that! Instead of moving their eyes to look at something, what do owls do? They turn their head.
Can owls turn their heads all of the way around?
Nope. They can get about ¾ the way around (so, if they were looking straight ahead, they could turn to look over their right shoulder, behind them, and continue to look over their left shoulder!) By not turning their head all of the way around, they’re protecting their spinal chord and all of their nerves.
Introducing the game:
We’re going to learn what it feels like to have to turn our heads instead of our eyes.
This game is basically like sharks and minnows. Most of the kids are going to get to be mice. They’ll run from one side of the game to the other trying to avoid getting caught. [Set up boundaries now]
Some kids will get to be owls. They’ll wear these Owl Goggles to make their vision a little bit more like an owl’s.
Remember, our owls will be gentle taggers. No pushing or grabbing.
If you get tagged, you’ll have to come over to a teacher to get digested. You’ll get to play the next round.
We’ll switch owls, so lots of people will get turns.
There are many versions of this on the internet. Madison Audubon has been playing this adapted version for so long that we’re not quite sure where it has come from!
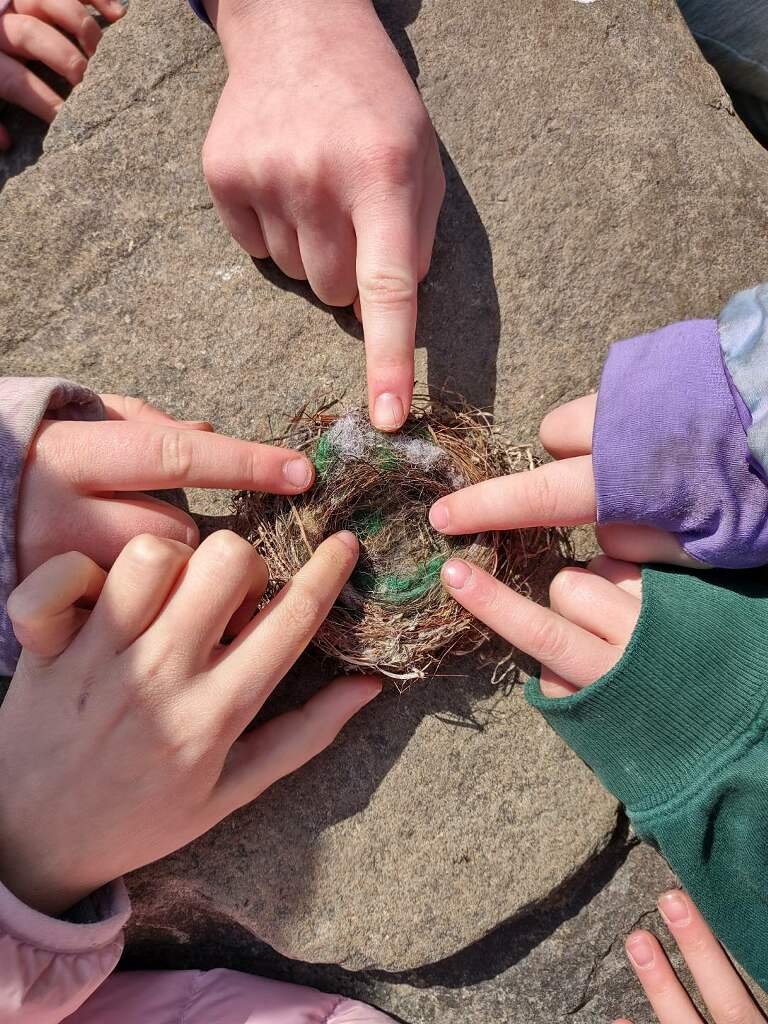
An up close and personal look into where a bird first calls home! Photo by Carolyn Byers

Everyday is a great day to enjoy birds! Photo by Carolyn Byers

Think like a bird trying to find home with Habitat Scramble Photo by Carolyn Byers

Did you know owls can’t move their eyes in their heads? That doesn’t make them any less fierce! Photo by Carolyn Byers
Cover photo by Mickenzee Okon/SoWBA. Students visit the International Crane Foundation, learning about birds and nature journaling.


